Follow the steps below to install the Smart Forex Tester software on Windows 7.
In Windows 10, you may need to do a couple of additional steps (Windows 10).
The process is very easy and will only take you several minutes.
NOTE: Use exactly the same procedure later for installing software updates.
Before you begin: if you already have our software installed and want to update to a newer version, make sure the software is NOT running. If it is – stop the software.
Step 1. After the software download has completed, locate the downloaded archive file. It has the name SmartForexTester-x.y.zip. The numbers x.y in the file name denote the software version. On the example screenshot below, we downloaded the Tester software version 1.0 on the Desktop.

Step 2. Right-click on the downloaded file and select “Extract all…”
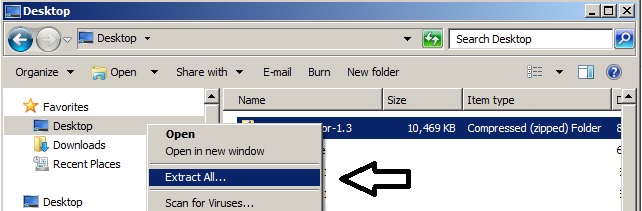
Now, Windows will create a folder with the same name (SmartForexTester-x.y) in the same location as the downloaded archive file. On the example screenshot below, the folder SmartForexTester-1.0 is located on the Desktop.

This folder contains the Tester installer: ForTesterSetup.exe.
Step 3. Double-click on the installer file. Windows might ask your permission to run it.
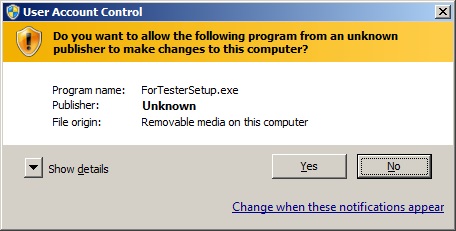
In this case, click the Yes button and the installer will start.

Make sure all options in the Select components to install – window are checked and then click the Next – button.
Step 4. In the screen that appears next, select the installation folder using the Browse – button.

Then, click the Install – button and wait for the installation to complete. Next, click the Close – button.

Step 5. You are all set! Now start the software from the Windows Start Menu, like any other program.

Ran into a problem with Smart Forex Tester Installation? Is something still unclear?
Don’t hesitate to contact us!